
Do you Want to know How To Remove Bike Crank Without Puller? Well, here we at BestComforBike.com will give you the complete guide. If you are worried about how to remove the bike crank without a puller, don’t worry.
In this article, we cover the entire guide on Cranks. Yet if you are not a trained mechanic, you have to be close with the basic bike servicing and preservation tips. You never know when and where trouble might look. Moreover, you also need to use the smallest quantity of money to fix your bike in the event of a failure.
For you to be able to do so, you have to be supervised judiciously. This is where we have arrived. Our team of top-notch researchers has completed a good job of distinguishing those problems you have to take care of. Read over our information below to discover out just what you may necessitate knowing. In this article, you will discover how to remove a bike crank without a puller.
Table of Contents
What Is Crank Puller Tool?

For your usual servicing and preservation, you necessitate a crank puller tool. This is a specialized tool that you will utilize to disassemble and collect the crankset of a bicycle. You may additionally use it for quite some general servicing and maintenance.
Normally, this device includes bolts and nuts. It removes the crank of the axle when engaged. In most maximum problems, this device is composed of aluminium which is lighter and extra stable. You necessitate some specific skills and expertise to manage this tool. That is because it is conceivably harmful and may create some lasting harm to your bike too.
How To Remove Bike Crank Without Puller?
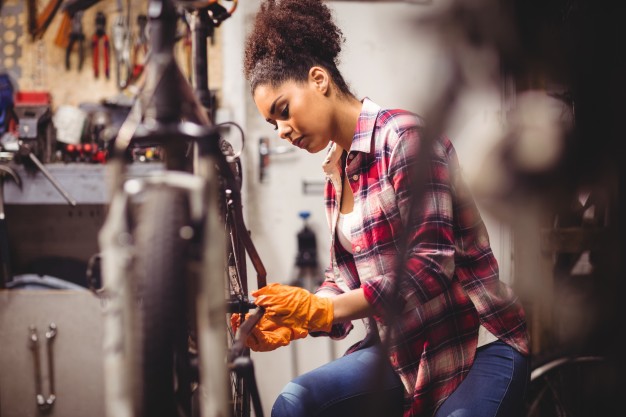
It is surely achievable to remove the bike crank without a puller. This is below the utmost crises and in states where there is no one to help. You have to understand and adhere to some of the most stringent operational ideas. The following are the moves you are obliged to follow:
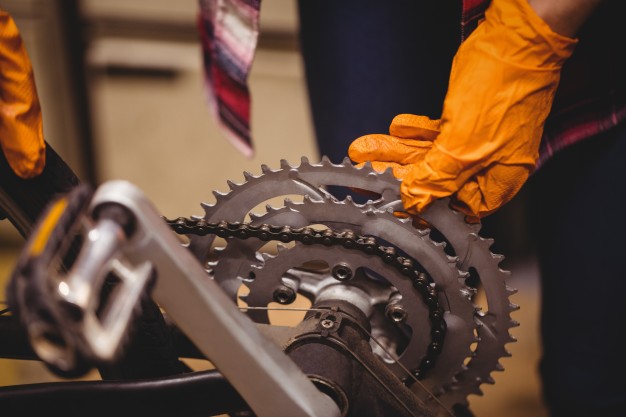
1: Cover your hands

It is not unusual to sustain any hand wounds in the means of removing the bike crank. The main causes of such damages are the roots that compose the bike’s chain ring. You need to preserve your hands adequately from such natural causes of damage.
To achieve that, you have to move the chain to the most comprehensive chain ring. You may utilize the bike’s gearing tool to accomplish this. On the other hand, you should apply some parts of the stick. Put the stick on the chains and smoothly lift it. Then, put the chain on the most comprehensive chain-ring lightly and securely.
2: Eliminate the crank nut or bolt
The next step, exclude the crank nut or bolt. This is to release the crankset and allow you to eliminate it hereafter with comparative comfort. To accomplish this, twist these nuts or bolts in counter-clockwise directions. Perform so gently and firmly to save you from any probable harms that do appear in the way of this.
In the case the bolt is hidden, erase the dirt caps which subsist thereon. The correct way you practice depends mainly on the formation of the caps themselves. Some demand that you pull them out, on the other hand, others require you to join them out. Be assured to work the right way for the avoidance of any problems.
3: Free yourself from any washers
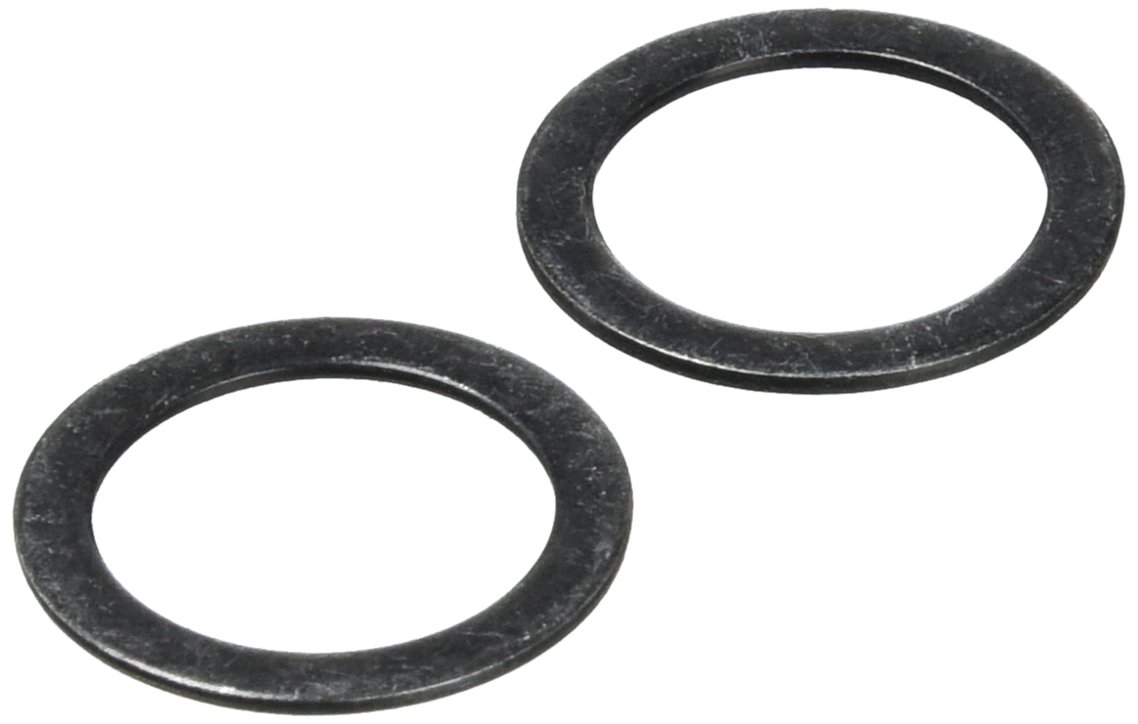
Now move forward to get rid of any washers which might live on the crankset. The Washers are metal discs that have holes in their cores. These are typically located in areas below the nuts and bolts. Though changing information and scope, these pieces serve extra or less comparable responsibilities and purposes.
They commonly help the actions of the wheels in one way only. This they perform courtesy of their pointed curves or levers. You will necessitate making do with a spanner or a bolt to get rid of them from where they are attached.
4: Examine the crank bolt and choose the right tool

Now Continue to examine the crank bolt. This step aims to find the proper tool for their subsequent removal. To perform this, you will have to adhere to some strict ethos and operational methods. This ethos, in turn, depends mainly on the sizes of the cranksets.
For the cranks that carry the M8 crank bolts, you are recommended to utilize the CCP-22 or CWP-7 that has a small tip. For those that have M12 or M14 or longer bolts, be advised to perform with the CCP-44 or CWP-7 both of which hold larger tips.
5: Rotate threaded coupler of the puller
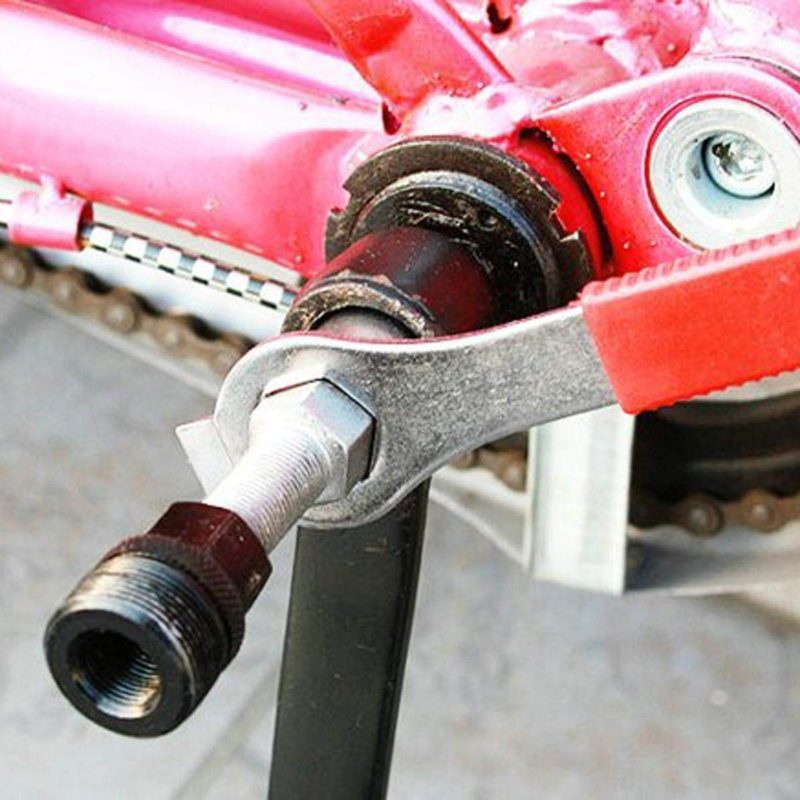
Move forward to rotate the threaded coupler of the puller. Perform until such a time that it recesses in the hex connection of the tool. While at it, be assured not to cross the thread. The purpose of all of this is to engage the 22 mm thread into the arm completely. You may have to use a spanner or a screwdriver to perform this task.
6: Thread the spindle driver of the puller into the arms
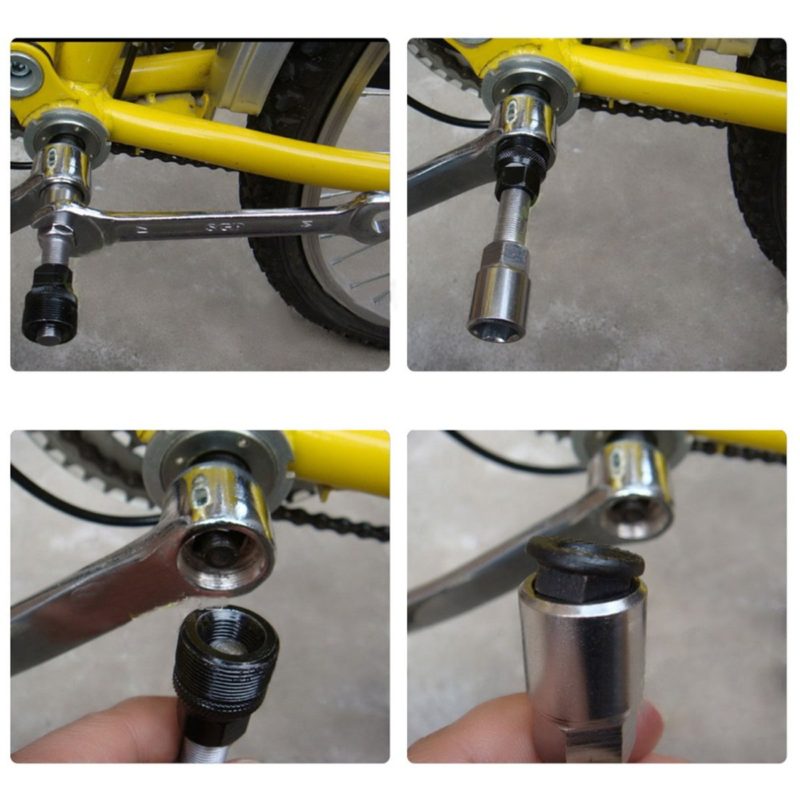
Next, you are into turning the threaded coupler of the puller, go on to thread the spindle driver of the puller into the arms. Utilize your bear arms to perform this task. Just enter the spindle driver into the slot that is allocated to it.
Hereafter, turn the driver in an anticlockwise direction. Perform this slowly and meticulously until the result is perfectly taut. Analysis for tautness after you are finished the task. Any loose driver may usually give rise to accidents when driving the bike hereafter. You desire neither of these to appear to you later.
7: Set the spindle in the clockwise bias
By spindle driver completely stiffened, you now have to change it in the clockwise bias. That is why you have to continue threading it into the puller till the time that the crank fully releases.
But repeatedly, you have to undertake this method gently and meticulously. Bustling may not just harm you but additionally pose some harm to the crankset itself. Locate the crank on some old newspaper and right close to you for simple references.
8: Unthread crank puller tool from the crank
By crankset instantly eliminated, you have to unthread the crank puller tool from the crank. While at it, take comprehensive care that you do not peel your knuckles while excluding the tools. This method is probably damaging to your body and skin. The last thing you would need is to worsen the position altogether.
9: Redo this method on the opposite side

After doing the above steps to one side of the bicycle, Go-ahead to perform the alike to the opposite side. Just follow the steps we have described patiently and to the letter. This way, you will bypass any additional problems which have the potential to confuse your expertise.
As perpetually, examine the bike to view to it that all the parts are quite disengaged. In the state of any problems, you might have to investigate the affected components to know the following way progressing to take. You are now able to go!
Mostly Asked Questions
Mostly people asked these questions and we try our best to answer these we hope these may help you.
Q1. How To Remove Mountain Bike Crank?
Copy these actions to perform so:
1: Open the left-hand crank
Start by opening the left-hand crank. Perform this by nipping bolts that clamp the left-hand cracks to the wheel axle.
2: Release the pre-load lid
Go on promptly to release and displace the pre-load lids which are at the edge of the crankset. Utilize some spanner to perform so yet repeatedly.
3: Raise the Safety Tab
Utilizing a tiny screwdriver, lift the security tab. In this way, you will get entrance to the center of the crankset. Plastic, being weak, gets injured effortlessly. Move slow and careful on this problem hence.
4: Remove the left-hand crank
Owning exalted the safety tab, you now have to remove the left-hand crank. Just get a grip on it and go gently, firmly, and easily.
5: Tap out the Axle
You are presently about good to move. Tap out the axle to conclude the method. Take care that you hurt not yourself.
Q2. How To Exclude Road Bike Crank?
The crank of the road bikes differs not so significantly from the mountain bike matches. They are just more delicate given that roads are few difficult to counter matched to the mountains. Copy these methods to accomplish this:
1: Eliminate the crank bolt
Utilize a 10 mm hex wrench to eliminate the crank bolt. This is the one that connects the crankset to the wheel axle. Be deliberate to minimize the chance of breaking any part.
2: Turn the wrench counterclockwise
On most bicycles, this bolt is attached too tight in such a way as not to provide for clutching when not in usage. You, therefore, have to rotate the wrench counterclockwise till you can twist no more.
3: Get the foot pedal off the bicycle
You are presently able to take the foot pedal off the bicycle. Use a crank remover to perform this. This one couple with the threaded components of the wheel. In such doing, it gives the power needed to pluck the pedal off.
4: Separate the Crank
Presently, move forward to eliminate the crank. Just hold it tight using bare hands. Then, using an insignificant force, pluck it gently and firmly from the bicycle.
5: Redo the Procedure elsewhere
Redo the similar method to the opposite foot of the pedal. You have ultimately accomplished the feat.
Q3. How To Eliminate Bike Crank Arm?
The bike crank arm is the one that connects to the pedals and chainring. It is enough bulky and additionally possibly unsafe. Watch these actions to extract it:
1: Pop out the safety tab
Begin with popping out the safety tab. Perform this by applying the screwdriver. Most maximum of them is composed of plastic. Be convinced hence to be patient and kind in order not to break it lastingly.
2: Displace and untwist the bolt
Hereafter, displace and untwist the bolt or nut. This is what connects the crank arm to the spindly. It is located at either end of the spindle. You will have to do with a 14 mm socket to accomplish this purpose.
3: Release the crank arm
Continue to release the crank arm. For this, you will have to use the crank arm puller tool. Slot it in and then stretch utilizing a wrenched arm.
4: Screw it counterclockwise
Ought inserted and toughened the crank arm puller tool, move forward to screw it counterclockwise. Perform so continuously it makes contact with the spindle. Next, rotate till it reaches the end.
5: Remove the crank arm remover
Instantly, the crank arm is free enough. Move forward to remove it. Just pick it out carefully. Next, move forward to redo the earlier steps on the opposite side.
Q4. How To Exclude A Crank Without A Bike Crank Puller?
We have previously noticed that you demand to use a crank puller to raise the crank puller arm off a bike. But, this may not perpetually have to be the problem. To perform so, just copy the steps described in the section above. Change the crank arm puller with a screwdriver and the spanner.
1: Pop out the safety tab
Begin by popping out the protection tab. Do this utilizing the screwdriver. Most maximum of them is made of plastic. Be assured hence to be patient and kind in order not to destroy it lastingly.
2: Displace and untwist the bolt
Hereafter, displace and untwist the bolt or nut. This is what connects the crank arm to the spindly. It is located at either end of the spindle. You will have to do with a 14 mm socket to accomplish this purpose.
3: Release the crank arm
Continue to release the crank arm. For this, you will have to use the crank arm puller tool. Slot it in and then stretch utilizing a wrenched arm.
4: Screw it counterclockwise
Ought inserted and toughened the crank arm puller tool, move forward to screw it counterclockwise. Perform so continuously it makes contact with the spindle. Next, rotate till it reaches the end.
5: Remove the crank arm remover
Instantly, the crank arm is free enough. Move forward to remove it. Just pick it out carefully. Next, move forward to redo the earlier steps on the opposite side.
Q5. How Do I Identify What Size Crankset To Purchase?
To get the right crankset, you have to take care of some circumstances. The following are the main concerns you have to examine:
1: Axle Diameter
These cranksets connect to the axles. They, therefore, have to be fit with the axle diameters. Be assured hence that the one you have in thought is likewise fit with your axle.
2: Crank Length
The length of the crank itself keeps values. Useless to say, you have to pick the crank arms which are cooperative with the inner leg lengths. This is essential for excellent controls and ease.
3: Sturdiness
You additionally have to be convinced that the crankset you press your hands on is firm and stable for long-term use. This can just occur if they are constructed of durable and firm elements like Aluminum and carbon fibre.
4: Adaptability with your Chainrings
Other than staying fit with your axles, a good crankset has also to be cooperative with the chainrings you have in consciousness. It is just in this way that you will like some stable rides.
5: Bottom Bracket (BB) Type
Finally, you also ought to conclude the bottom bracket types. Be assured that the crankset you plan to lay your hands on is cooperative with them with concerns to shape, size, and arrangement.
Q6. What Is the Official Crank Arm Length?
The 175 mm has for a long time remained hailed as the official crank arm length. In modern times though, many lengths have been taken as usual or likely. Samples of these are 170 mm and 172.5 mm.
The ball is hence squarely on your session now. It is upon you to decide the length that is more comfortable and beneficial for your course. Easily assess your height, feet size, and wanted levels of relief to come at the most likely standard size.
Q7. Does Crank Length Affect Gearing?
Yeah, they do! The longer cranks tend to affect the gearing devices of your bike. A more extended crank length usually raises the ratio significantly. The more compressed cranks, on the opposite hand, decrease this ratio. If you have such a set on your bike, you have to use extreme force to make the corresponding output.
Some investigations suggest that a 5 mm rise in the crank length produces a 2% rise in the gearing levels. Consider hence what is probable to happen if the rise in length may be meaningful (like 10 mm)? You hence require to factor this as well in your research for the correct cranksets and riding situations.
Q8: Does Crank Length Affect the Saddle Height?
Surely! The crank lengths diffusely affect the lengths of the pedals. The shorter cranks can barely work with shorter pedals and vice versa. With shorter pedals, the saddle height has to be reduced to allow the rider to engage the said pedals simply and effectively.
The contrary refers to the more comprehensive cranksets. They claim that you raise the pedals to allow the rider to engage the pedals with comfort. If this is not satisfied, then the riding practice will be full of difficulties and struggles. You should be careful of both parameters before you set out.
Q9. Are Shorter Crank Arms Better?
Yes, they are! Below are the chief reasons which notify this point:
1: Improve Speed
The smaller cranks have been perceived to hugely improve your speed of tours. The chief purpose underlying this is reduced wastage of power as you move along.
2: Enhances Fit
It has further been seen that smaller cranks adjust fit. This is about matters aerodynamics, strength, and ease.
3: Improves Comfort
Such a length decreases the range of motion at your knee level. These involve problems to do with flexion, extension, lower back, and hips.
4: Joins Power
With the decreased crank length comes to improved energy output. It does so fundamentally by decreasing the restrictions through the pedal strokes by opening up the hip angle and decreasing the flexion of the knees.
5: Bolster Aerodynamics
By settling on a more short-tempered crank, you will learn to ride on an angle that is below your seat. That, of course, reduces the frontal surface area, therefore, enhancing your aerodynamics.
Q10. What Is the best Crankset for a road bike?
The field of the cranksets is overwhelmed with multiple members and products. However, some brands and goods stand out from the pack. As of the year 2019, the following have been noted to be the most reliable cranksets for road bikes:
- Shimano 6800 Ultegra
- Sram Red22 GXP
- Shimano Dura-Ace FC-9000
- Sugino XD600
- FSA K-Force Light 386
- Shimano 105 Triple
- Origin8 XLT Road
- Sram S300 Courier
Useless to state, in your research for the best cranksets, you have to prioritize them. They are further likely to provide you with sufficient relief and long-lasting results.
Final Verdict
We have laboured to showcase to you all that concerns this subject of bike cranks. It is now excellent for you to move on to complete the penetration you have got. This can only imply obtaining a proper crankset, sharing this knowledge with others, or practising the insight as a director to fixing your bike.
Yet doubtful of how to continue? We are always glad to provide more knowledge. Just let us know about your situation and we shall arrange so. All the best as you still think about taking the much-needed first step!


