
The left bike crank arm is held in place by a threaded bolt called the crank bolt. This bolt is held in place by a plastic cap that must be removed before you can loosen the crank arm. The main problem is how to remove bike crank? Once you have access to the nut, use a metric hex wrench. And turn it counterclockwise until it’s loose enough to pull the crank away from the bike’s frame.
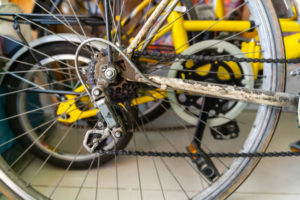
Table of Contents
How to Remove Bike Crank?
Generally how to remove bike crank? Firstly loosely screw the crank bolt. Do not remove the bolt altogether. Do not tighten the bolt, but enough so that it cannot come loose by itself. Do not remove the crank arm from your bike crank at this point.
Put on your motorcycle gloves and take hold of your bike’s handlebar grips with your opposite hand. With a wrench in each hand, turn your bike around so you’re looking down at your front wheel.
Place a wrench on either side of the front axle, on either side of the left-side tire (if it’s a right-side bike).
Slide one wrench under each side of the axle and lift up until it clears the axle tube behind it, then tighten them down into place with another wrench.
Repeat for both tires and axles on your other side of the bike, then repeat for both sides again on each wheel axle as well as on each frame tube as well (frame tubes are located where the frame meets the engine).
When finished tightening everything down, check all four corners to make sure they’re secure!
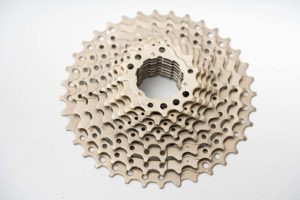
How do you remove a crankset bolt?
There are two bolts that hold on to your crankset. One is at the top of the crank, and one is at the bottom of the crank. If you’ve never done this before, don’t worry! It’s not too difficult and just get properly how to remove bike crank.
Remove these two bolts by hand, then remove your pedal from its axle. This should be easy to do if you have a wrench handy, but if not you can use some pliers or screwdrivers as well.
Remove pedal spindle from bottom bracket shell.
Remove this part by hand or with some pliers or something similar. You may need to push down on it a little bit to get it off, so make sure you’re on firm ground so that you don’t damage anything!
If you have a BSA bottom bracket, there are two bolts that hold it in place on your crankset. The first bolt is at the bottom of the left crank arm and goes through a hole in the left side of the frame. This is usually a square-head bolt with a thick head. The other bolt is at the top of the right crank arm and goes through a hole in the right side of the frame. This is usually a hex-head bolt with a thin head.
If you have an ISIS bottom bracket, there are three bolts that hold it in place on your crankset. The first two bolts are at either end of each crank arm and go through holes in both sides of your frame. These are usually hex-head bolts with thin heads. The third bolt is in between each crank arm and goes through another hole in both sides of your frame (where they meet). This one is usually round-head with a thick head (but can be any size depending on what kind).
How to remove bicycle crank?
The bicycle crank is a part of a bicycle that rotates the pedals. The most common method for removing a bicycle crank is to use a wrench or socket and loosen the nut until it comes loose.
If you are not sure how to remove bike crank or bicycle, you can use an Allen wrench to loosen it. This can be done by placing the Allen wrench between the shaft and the tip of the handlebar, then turning it counterclockwise with your fingers until you feel resistance. Once you feel resistance, turn your fingers in opposing directions until you hear a click and feel free movement in both directions.
- Remove the top cap from the crank arm. The cap should be held in place with a small screwdriver that is inserted through a hole in the plastic.
- Remove the bolt securing the crank arm to the frame of your bike. This bolt can be either a standard 30mm or 35mm length depending on your bike and its design.
- Remove the crank arm from your frame by removing those two bolts that secure it to your frame, along with any other bolts that secure it to another part of your bicycles such as its stem or handlebars.
- Take out all of the parts inside your crankset one by one, making sure not to lose any loose pieces along the way!
Remove the left crank and spindle.
- Remove the left crank arm.
- Remove the pedal spindle.
- And then remove its spindle from the right side of your bike frame by taking off its axle nut. Or quick release lever with an Allen wrench (or hex key).

Install the new crank with the pedal spindle.
The next step for how to remove bike crank properly you should install the new crank in a proper way.
- Make sure the pedal spindle is aligned with the crank arm.
- Tighten down on one side of the pinch bolt, and then tighten down on the other side of it to secure it in place.
Tighten the crank bolt.
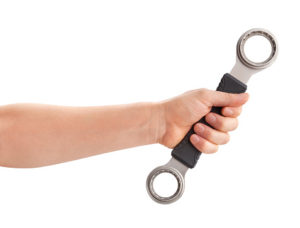
- Use a torque wrench. A torque wrench measures the force you apply. When tightening or loosening bolts, nuts, and screws. Set the torque wrench to about 40 foot-pounds (ft-lb) and tighten your crank bolt to this setting.
- Use a crank bolt wrench. A crank bolt wrench is a small tool that will fit over your crank’s outer shell. And allow you to turn it counterclockwise until it becomes loose enough for removal. You may also find loose wrenches at auto parts stores or bike shops. Make sure they’re made for removing crankshafts!
Remove the pedal.
This step is important for understanding how to remove bike crank in a proper way. And make it easy at home . The step is removing the pedal in a proper way.
- Using a pedal wrench, remove the pedal from the crank. If your bike has a fixed gear (no freewheel), skip this step and go to Step 2.
- Remove the pedal from the spindle. The spindle holds the crank on one side and attaches to the frame or another part of your bike like an axle.
- Remove it from its body by turning it counterclockwise until it pops out of place. Then pull up on it before rotating again to free any electrical connections.
Unbolt the crank arm.
- Remove the crank arm bolt. The exact location of this bolt will vary depending on your bike. But it’s generally located near the bottom bracket.
- Unscrew and remove the pedal from one side of your bike (it should come off ).
- Remove both crank arms by unscrewing a large bolt on each side of your bike frame, at or near where they meet up (again, this may vary depending on your brand). Be careful not to lose any parts; take note as you remove them so that you can reassemble them correctly later!
Pull the crank arm away from the bike.
How to remove bike crank, you’ll have to disconnect it from the pedal. Loosen the bolt on top of the pedal with an Allen wrench and pull off your pedals. Then, grab one end of your crank arm and pull it away from the bike until it detaches; repeat for the other side. Finally, detach both ends of your crank arms from their respective holes in your frame. Or fork by pulling them straight up. There should be no resistance here unless they’re stuck due to rust or grime build-up.
Conclusion
Bike cranks are a standard part of biking that serve an essential function. Many people confuse about how to remove bike crank properly? In the article, we have mentioned it properly.
Keeping them in good condition is necessary if your bike runs smoothly. It also covers common problems with these parts, e.g., broken bolts. And how best to address them at home. Without spending money on costly repairs from professional mechanics or shops!


